TopGFX Post Editing Tutorial
TopGFX Post Editing Tutorial
Things you may need: Permission from the System Administrators to Edit your own posts Please PM:
Admin or
Mac.
Updated Product information
Updated Download links
Updated product page link
Updated product images
Information on required products for use & Information on which software Product is compatable with:
Daz only, Poser only, Daz & Poser and minimum version of software. For example: Poser 5 and higher, Poser Pro 2014,
Daz Studio 3 and higher, Daz Studio 4.8 only(I-Ray only) or 64bit for Daz HD Products for Studio 4.7 and newer.
Getting Started:Open a new tab in your browser by right-clicking on the Add News button in the black toolbar to use as a reference
and as a source for additional link lines.
Click open the drop down menu attached to your
User Name and click the Administration button.
This button will re-direct you to the DataLife Engine Control Panel.
You can also open this link:
http://topgfx.info/user/(YOUR USER NAME HERE)/news/
Drop Down Menu

Below your
User Name and Avatar(if you added one to your Profile) you will find 2 buttons:
Add News(this is for more experienced users as there is NO TEXT PLACE-HOLDERS, just blank Story Panes)
and Edit News which contains a list of ALL of your News Posts.
DataLife Home

Click the Edit News button to access the list of your News Posts.
There are 7 columns:
Subject:,
an EYE symbol(shows the number of page views),
a Speech Balloon symbol(for the number of comments attached to your Long Story),
Published,
Category,
Posted by,
and a column with a checkable box for each post and a select all master check box in the column header
which interacts with the Perform Action menu at the bottom of the page. we are Not covering the use of
that menu in this Tutorial. We are going to ignore the existence of the last column for this Tutorial.
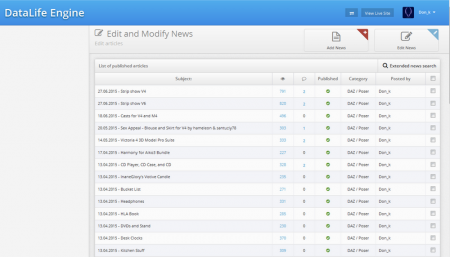

We are looking in the Subject: column for the News Post that requires editing.
Click on the appropriate Post.
Example Post:

Short Story:
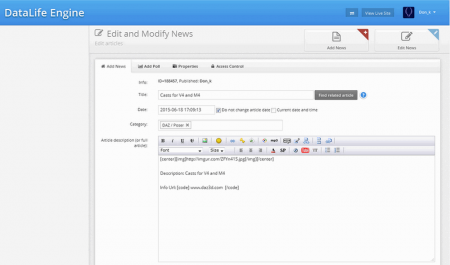
In the Short Story you can replace the Image Link, Update the short description,
insert the full page link in the Info URL Code Box, and add a second code box
below the URL code box if the product is no longer for sale:
No Longer Available
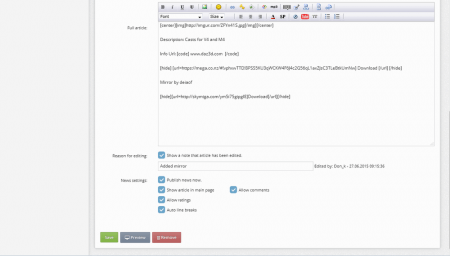
Long Story:
Extra images can be added like this:
[center][img]http://topgfx.info/uploads/posts/2015-10/1446320028_gwMAnwg.jpg [/img][/center]
[center][img]http://topgfx.info/uploads/posts/2015-10/1446320028_89tdDfc.jpg [/img][/center]
[center][img]http://topgfx.info/uploads/posts/2015-10/1446320028_Ci4u4Qy.jpg [/img][/center]
[center][img]http://topgfx.info/uploads/posts/2015-10/1446320028_jjGFUxf.jpg [/img][/center]
[center][img]http://topgfx.info/uploads/posts/2015-10/1446320028_pMuCYe2.jpg [/img][/center]
[center][img]http://topgfx.info/uploads/posts/2015-10/1446320028_eon121m.jpg [/img][/center]
[center][img]http://topgfx.info/uploads/posts/2015-10/1446320028_vjUwHWT.jpg [/img][/center]
[center][img]http://topgfx.info/uploads/posts/2015-10/1446320028_fiDkHJE.jpg [/img][/center]
[center][img]http://topgfx.info/uploads/posts/2015-10/1446320028_2WYnIGE.jpg [/img][/center]
Add a longer description
Update the Product's Info URL
add a second code box below the URL code box if the product is no longer for sale:
No Longer Available
and add mirror links for download:
[hide] [url= http://depofile.info/ ] Download [/url] [/hide]
Mirror
[hide] [url= http://depofile.info/ ] Download [/url] [/hide]
or if using multi-part links:
[hide] [url= http://depofile.info/ ] Download Part 1[/url] [/hide]
[hide] [url= http://depofile.info/ ] Download Part 2[/url] [/hide]
[hide] [url= http://depofile.info/ ] Download Part 3[/url] [/hide]
Download can be enhanced by adding: Download from MEGA or DepoFile or whatnot or
even replaced with a small button image from PhotoBucket and uploaded to your Image Host
[hide] [url= http://depofile.info/ ] [img]http://topgfx.info/uploads/posts/2015-10/1446320028_HMl5cJy.gif[/img] [/url] [/hide]
You must register before you can view this text. Please
register and
Login[hide] [url= http://depofile.info/ ] [img]http://topgfx.info/uploads/posts/2015-10/1446320028_IS9VHOo.gif[/img] [/url] [/hide]
You must register before you can view this text. Please
register and
Login[hide] [url= http://depofile.info/ ] [img]http://topgfx.info/uploads/posts/2015-10/1446320028_OpflZlY.gif[/img] [/url] [/hide]
You must register before you can view this text. Please
register and
LoginYou can also open this link:
http://topgfx.info/user/(YOUR USER NAME HERE)/news/
This will lead you to all of your Posts' Short Stories. At the bottom of each post
you will find this Box:


When you click the blue Edit button you get a drop down menu with 2 link buttons:
Full Edit - This leads you to the DataLife Control Panel Edit Page for that Post.
Quick Edit - This opens a pop-up window that is similar to the Add News Page that
is opened in the TopGFX Toolbar "Add News" button.

The above editing steps also apply to this Editing Window, the boxes containing the
text in the Short and Long Stories are adjustable in size by the lower right corner
of each box to better fit the text and Bulletin Board Code in each panel. There is no
Preview feature by this method, just Save and Cancel buttons at the bottom of the
Quick Edit Window.
Any Poster can use the Quick Edit feature without the permission needed in the
DataLife Control Panel
HAPPY POSTING & EDITING!
Don_k


